Rolodex Lookup
The Rolodex Lookup (a.k.a. Non-Employee Lookup) screen allows you to refine criteria to search for and retrieve resulting contact information about non-employees. The purpose of the Rolodex maintenance document is to create and maintain contact information for members of organizations outside your institution.
• Search Results: The results display information in table format that is sortable by column (for example, by Organization or Last Name). These can also be exported to a spreadsheet on your local drive. Results include name, organization, location, contact and sponsor information.
• Drilldown Actions: From the results, you are able to “drill down” on Sponsor Code column links that display information about the sponsor the non-employee is affiliated with from the Sponsor maintenance document. Also from the results, you are able to click a Rolodex Id column link to drill down into the complete Rolodex table record in a separate browser window.
• Other Available Actions: With sufficient permissions, additional actions are possible, including create new (creates a new Rolodex maintenance document), edit (modify existing Rolodex maintenance document), or copy (copy content to a new Rolodex maintenance document with a unique document number that you can then modify).
Access
It is accessed from either the Unit or Central Admin menus via the Non-Employee Lookup link in the Quicklinks group.
Additionally, it is accessed from the Maintenance menu via the Non-Employee Lookup link in the Shared group.
Layout
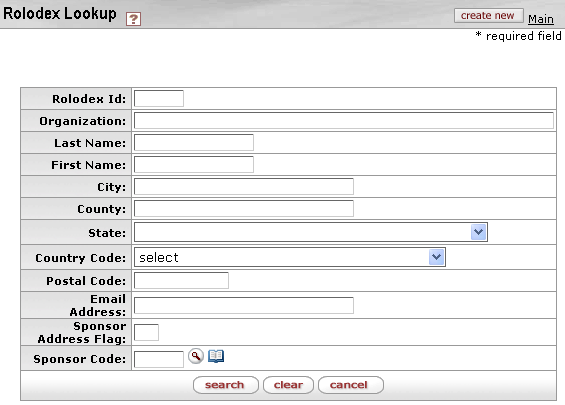
The Rolodex Lookup screen displays several selection and entry fields in addition to action buttons in the search criteria area. Results are displayed below the search criteria area in table format.

Figure 113 Rolodex Lookup Screen – Search Criteria Area Layout
Table 39 Rolodex Lookup Screen Field Descriptions
|
Field |
Description |
|
create new button |
Click the create new |
|
Rolodex Id |
A numeric code value assigned to each non-employee to uniquely identify it in the system. |
|
Organization |
The textual name of the organization as it is commonly known of which the person is a member (or is affiliated with). |
|
Last Name |
The textual last name of the person. |
|
First Name |
The textual first name of the person. |
|
City |
Enter the city for the non-employee’s address. |
|
County |
Enter the county for the non-employee’s address. |
|
State |
Select one of the United States of America from the
list. Use the drop-down |
|
Country Code |
Select one of the Earth’s countries from the list to
specify where the organization and person are located. Use the
drop-down |
|
Postal Code |
Also known as the zip code associated with the business mailing address. |
|
Email Address |
Requires an at @ symbol. |
|
Sponsor Address Flag |
Indicates whether this is also a sponsor address or not. |
|
Sponsor Code |
If the non-employee is affiliated with a sponsor on
record in the system, enter and/or select the corresponding code for that
sponsor. Type the suspected value in the box and click the direct inquiry |
|
Action Buttons |
Click search to retrieve the results, which are displayed in table format below the search criteria area. Click clear to erase previously-entered criteria. Click cancel to return to the main menu. |
|
|
For more information about general lookup screen functionality, see “Lookup” on page 67 in Selection, Entry & Action Tools. |
 button at the top, right of the
screen to initiate a new, blank Rolodex maintenance document.
 icon or click the
  icon to search for and return the value
to populate the box automatically.